In this article, you will learn how to create and manage custom tags within your JobyDesk workspace to better organize your clients and projects.
Tags are flexible labels you can apply to customers and jobs. By establishing custom tags, your team can instantly categorize information, track priority statuses like VIP or callbacks, and filter through your data with ease.
Creating a new tag
In order to organize your workspace with custom labels, you will need to access your tag management settings.
1. Navigate to Settings:
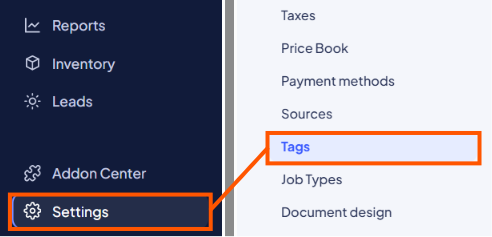
From the bottom of the left-hand navigation menu, click Settings.
2. Access Tags:
Under the System Settings menu, select Tags.
3. Open the Tag Creator:
Click the black + New tag button in the top right corner of the main panel.
4. Enter a Tag Name:
Type a clear, descriptive Tag name into the text field (e.g., VIP, Callback, Commercial).
5. Define the Scope:
Use the Applies to dropdown menu to choose where this tag can be used. Your options include:
- Customers only
- Jobs only
- Customers and jobs
6. Choose a Color:
Select a visual color swatch from the palette to make the tag easily identifiable across your dashboard.
7. Save the Tag:
Click the Save tag button to finalize and add it to your system.
Notes
A tag’s scope dictates where it shows up in your workspace. You can use the filter pills (All, Customer, Job, or Both) at the top of the tag management screen to easily sort, view, and narrow down your existing tags by their scope.