In this article, you will learn how to customize the design, layout, and content of your JobyDesk documents.
Creating professional, branded documents is essential for building trust and credibility with your customers. By customizing your invoices, estimates, work orders, and payment receipts, you ensure a consistent brand experience that highlights your professionalism while making it easy for clients to review their requested services and billing details.
Updating your document settings
In order to customize your document layouts, you will need to access your system settings.
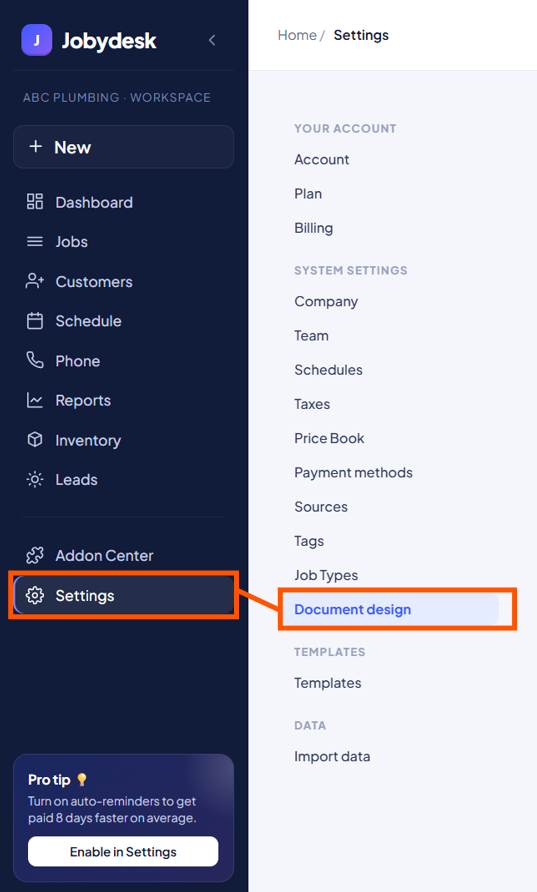
1. Navigate to Settings:
From the left-hand navigation menu, click Settings.
2. Set your Company Brand (Optional):
Under the System Settings menu, click Company to upload your brand logo and establish a primary brand color.
3. Access Document Design:
Click Document design from the System Settings menu.
4. Select a Document Type:
Under Document type, click the specific document you want to preview and edit (Invoice, Estimate, Work Order, or Payment Receipt).
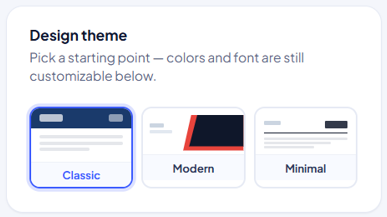
5. Choose a Design Theme:
Select a starting layout. Options include the Classic, Modern, or Minimal templates.
6. Customize Colors and Font:
Adjust the visual styling of your documents to match your brand.
- Under Colors, choose your preferred Header background, Header text color, and Accent color.
- Under Font, select a typeface from the available options (e.g., Arial, Helvetica, Georgia).
7. Update Document Text:
Scroll down to the Document text section to customize specific messaging.
- You can add a Title override, Text below logo, and custom Footer text.
- Input your default policies into the Terms & conditions text box.
8. Show or Hide Fields:
Scroll down to the Show / hide fields section and use the toggle switches to add or remove specific elements from your layout.
- Available toggles include Company logo, Signatures, Service date, Payment method, Check in / out times, and more.
9. Review and Save:
Check the Live Preview panel on the right side of the screen to review your changes in real-time. Once you are satisfied, click the Save design settings button at the bottom of the screen.
Your newly styled documents are saved and you are now ready to send beautiful, professional estimates and invoices to your customers.